4/27/2012

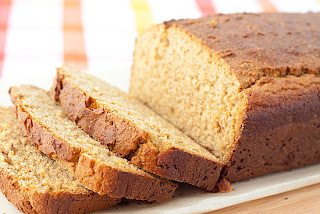
Gluten Free Ezekiel Bread Would Do Better As An Option In One's Diet


Gluten Free Ezekiel Bread
What is Ezekiel bread? This kind of bread gets its name from the prophet Ezekiel who ate this as his only form of sustenance while being in the desert for 390 days. This bread was specially prepared by him through God's instructions to be able to survive only on this and water. This kind of bread can be bought from health stores, from Food for Life (who make Ezekiel bread and other organic eats), who were the first to be able to combine six kinds of organic legumes and grains which when sprouted and then mixed, make up the bread.

The sprouting stage makes all the difference, since this process allows one to easily digest it, while also creating a protein that is very close in relation to what is present in eggs, whey and milk. The protein's quality is just as good as normal protein, and comes surprisingly close to it in terms of comparison and nutrition. It also contains amino acids that are obtained from vegetable sources.

The sprouting process when done, releases a component called maltose, which is a grain sugar that isn't easily absorbed by the body. This in turn brings on a low glycemic response making it an ideal food choice for weight watchers and those who are diabetic. So is Ezekiel bread gluten-free? No it's not, since the grains have naturally occurring gluten in their content. Gluten free Ezekiel bread can be made at home, since the ingredients can be replaced with gluten-free ones to make it almost like its original counterpart.

Ezekiel Bread IngredientsThe original ingredients that make up this bread are those that can be substituted when trying to make bread recipes that are gluten free. The ingredients of this bread are.
  • Organic-sprouted whole oats
  • Sprouted whole barley
  • Organic sprouted whole millet
  • Malted barley
  • Organic sprouted whole kernel corn
  • Organic sprouted whole wheat
  • Fresh yeast
  • Organic sprouted whole rye
  • Organic honey
  • Sprouted whole brown rice
  • Soy lecithin
  • Molasses
Ezekiel Bread Recipe (Gluten-free Version)

Celiac disease is a condition that a lot of people suffer from because their system rejects the ingredient gluten. For those who wish to cancel out this add-on in meals, can try out this great recipe that doesn't contain traces of this ingredient.

What You'll Need:
  • 1 cup quinoa
  • ½ cup rice flour
  • 1 teaspoon of baking soda
  • ½ cup water
  • ½ cup coconut flour
  • 1 cup millet
  • 4 tablespoons of coconut oil
  • 3 teaspoons of baking powder
  • 5 eggs
  • ½ tablespoon of sea salt
  • 2 cups of low-fat milk
  • 1 cup of sesame seeds
  • 2 tablespoons of honey
Method of Preparation:

Pre-heat the oven to 350°F before you get started on making the bread. 24 hours prior to the day that you make your bread, soak the quinoa, sesame seeds and millet in lukewarm water until it is ready to be added to the mixture once it has softened the next day. This part in the process is necessary to make them sprout in a span of 24 hours to help release its vital nutrients. Strain out the water the next day and make two portions of this mixture. One at a time, use the first portion and put this into the mixer, blending it with milk until it has this nice consistency; repeat this again for the second half.

Mix in your baking powder, coconut, and rice flour along with the baking soda and blend thoroughly. Grease a bread pan before pouring in your mixture, and slip this into the oven for about an hour. To check if it is done, you have to insert a knife into the bread and make sure it comes out clean. You can always put an aluminum foil atop the bread pan to avoid the surface of the bread from browning too soon, leaving the center uncooked in the process. You can then slide your piping hot bread out of the oven, slicing these into medium-sized portions. Coat these with honey and sprinkle with sesame seeds, before you bite in. You can have this also with peanut butter, jam or a nice generous layer of cream cheese, turkey slices and olives.

Gluten free Ezekiel bread would do better as an option in one's diet when keeping health in mind. Being also a little on the expensive side, this would make for a great recipe to cut down on the extra costs when bought from a store. Have a healthy tomorrow.

4/16/2012

Check It Out - Tomato Pie Recipe Is Easy To Make And Tastes Great!

Before I disclose to you the promised tomato pie recipe, let's bite deeper (pun intended) into the crust and discover some interesting facts about this incredible edible. Tomato pie is a close derivative of the Sicilian pizza and is very popular among American people of Italian and Sicilian heritage. There are quite a few different types and variants of tomato pie and most of these variants are attributed to various different American regions, based upon where each variant is believed to have originated from. For instance, the most elementary form of this tomato recipe is believed to have originated from Utica where it has been made and sold since as early as 1914. On the other hand, the Trenton tomato pie variant is traced to this capital city of New Jersey. Tomato pies are an inseparable part of Italian American cuisine and their cheese-n-spices flavor make them a hit, no matter what ethnic palates experience them. Praises apart, let's take a look at a couple of interesting tomato pie recipe.

Utican Tomato Pie Recipe

This is the basic, most elementary recipe for tomato pie which is believed to have originated in Utica, the proverbial birthplace of tomato pies! Check it out - it's easy to make and tastes great!

Ingredients
  • Crushed Tomatoes (canned) - 32 ounces
  • Extra Virgin Olive Oil - 3 tablespoonfuls
  • Garlic - 2 cloves
  • Dried Oregano - 1 teaspoonful
  • Pizza Dough - 1 pound
  • Pecorino Romano Cheese (grated) - 3 tablespoonfuls
  • Salt to taste
  • Pepper to taste
Preparation Method
  • Grease a cookie sheet with the extra virgin olive oil and stretch pizza dough to cover it.
  • The dough layer should have a minimum thickness of at least 1 to ¾ th of an inch.
  • Preheat the oven to about 450 °F and allow the dough to rise slightly.
  • Meanwhile, start preparing the sauce by first heating a saucepan moderately and then sautéing garlic cloves in the olive oil on medium flame till the garlic cloves turn slightly golden.
  • Next, add the oregano, salt, pepper and crushed tomatoes to the sautéed garlic and cook for about 10-15 minutes or till the sauce assumes a thick, creamy texture.
  • Take the frying pan off the flame, and allow the sauce to cool till it has reached room temperature.
  • Pour this sauce over the pizza dough and place this sauce topped dough into the preheated oven.
  • Bake at 450 °F for about 20 minutes
  • Take the pie out and sprinkle the grated Pecorino Romano cheese on top of it.
  • Allow it to cool before serving.
While the pie cools, the escaping heat partially melts the cheese sprinkled on top, giving your Utica tomato pie a cheesier edge (wink!)!

Tomato Pie With Bacon Recipe

This recipe is for those incorrigible meat lovers (myself included!) who cannot be satisfied with an all-veggie fare and must discern at least a slight hint of non vegetarian ingredients to consider the dish worthy of their palates!

Ingredients
  • Deep Dish Pie Crust (about 9 inches thick) - 1 unit
  • Large Tomatoes (sliced and peeled) - 4
  • Scallions (finely sliced) - 3
  • Bacon (chopped, cooked, drained) - 1 pound
  • Dried Oregano - 1 teaspoonful
  • Powdered Garlic - ½ teaspoon
  • Red Pepper (crushed) - ½ teaspoon
  • Mayonnaise - ¼ cup
  • Shredded Cheddar Cheese - 2 cups
Preparation Method
  • Fill alternating layers of tomatoes, scallion, basil, garlic powder, bacon, red pepper and oregano into the pie crust.
  • Keep the oven preheated at 375 °F while you're layering the pastry shell.
  • Mix the shredded cheese and mayonnaise together and spread this mixture over the yet-to-be-baked pie's surface.
  • Cover this pie with an aluminum foil and place it inside the preheated oven.
  • Bake for about 30 minutes.
You can either make the crust from scratch or you can get a ready-to-use one from your neighborhood grocer. Serve it warm or allow it to cool - take your pick. It tastes great both ways!

You can try a lot of other variants such as spinach, chicken or green tomato pie - with an ounce of imagination and a sprinkle of innovation, you can very well come up with your own recipe variant! Try different various ingredients for the sauce or pie filling along with the staple tomatoes and cheese - you never know, you could actually have a whole new tomato pie recipe named after you!

4/11/2012

Different Ways To Make Shrimp Tempura Roll

Tempura is a Japanese dish made by deep-frying sea food or vegetables. Even though, it is a Japanese delicacy, it is believed that tempura is Portuguese in origin and is introduced to Japan during the sixteenth century by the early Portuguese traders and missionaries. However, it is popular as a Japanese dish, which is commonly served as appetizers. Shrimp tempura can be served as rolls too. Let us take a look at how to make shrimp tempura roll.

Shrimp Tempura Roll Ingredients

Tempura is a dish which consists of deep-fried seafood or vegetables, that are coated with special batter. In order to make shrimp tempura rolls, firstly, shrimp tempura is made by deep-frying the shrimp coated with the batter. This shrimp tempura is then wrapped, with some other ingredients, so as to form rolls. Apart from fresh shrimp (cleaned, peeled and deveined), you need, rice flour or all-purpose flour, icy cold water, egg and Japanese rice wine for making the batter. Some people use all-purpose flour with a small amount of cornstarch, egg, cold water and a teaspoon each of baking soda and baking powder, etc., for making batter. There are various recipes for preparing the batter. In order to prepare the rolls, nori and sushi rice will be required. Let us take a look at an easy shrimp tempura roll recipe.

Shrimp Tempura Recipe

In order to prepare shrimp tempura roll, you have to first make shrimp tempura. Prepare the shrimp by cleaning, peeling and deveining. Cut the tail and the sharp end in between the tail fins. Place the shrimp on paper towels, so as to get rid of moisture. Now, you can fry the shrimp. Before that, you have to prepare the batter by mixing the flour, one egg, water and rice wine. Take a bowl and mix the egg with half cup cold water. Once it combines well, add a tablespoon of rice wine and mix thoroughly. The next step is to add the flour. You can either use a cup of rice flour or a mixture of ¾ cup all-purpose flour and ¼ cup of corn flour. If you go for the second option mix the two flours before adding them to the bowl. Now, add the flour to the bowl and mix well. Small lumps are allowed, but, the batter must have a fairly thin consistency. Heat the cooking oil to a temperature of around 350° F. Flour the shrimp and dip them in the batter before frying them. Fry the shrimp till they get golden brown in color. Place them on wire racks or paper towels, so that excess oil is absorbed. Your shrimp tempura is ready. Now, you have to wrap them in rolls.

Wrapping Shrimp Tempura Roll

You have to use nori and sushi rice to wrap shrimp tempura roll. Take a nori sheet and divide it into three equal pieces. Now, place a sushi mat and a plastic wrap on top of that. Place a nori piece (with smooth side facing downwards) on top of the plastic wrap, which is kept over the mat. Now, spread a thin layer of sushi rice (1/10 of an inch in thickness) over the nori sheet, so that a thin margin on one edge (lengthwise) of the nori sheet is left uncovered (by ¾ of an inch). Now, flip the nori, so that the smooth side faces upwards. Now, make a wall of rice on the side, which is opposite to the uncovered strip on the nori sheet. Now, you have a nori sheet with one side having an uncovered margin and the opposite side with a wall of rice, that extends from the edge by ¾ of an inch. This extended wall of rice will cover the uncovered strip, while the contents are wrapped in a roll. Now, place the shrimp tempura, horizontally across the nori, with the tail ends extending over the edge. Now, lift both sides of the sushi mat and apply pressure, so that the nori with rice and shrimp get wrapped tightly to form a roll. The end product will be in the form of a long roll with shrimp tempura in the center, covered with nori and sushi rice. Now, remove the plastic wrap and mat and cut the cylindrical roll diagonally into ½ inch thick slices, that can be served with dipping sauce. You may also read more about tempura batter recipe and tempura sauce recipe.

Now, you know how to prepare shrimp tempura roll. All you have to do is to try this recipe and enjoy the delicacy. As shrimp tempura calories may vary with the ingredients, you have to keep a check on the contents.

4/01/2012

Enjoy The Healthy Quinoa Breakfast Cake Recipes Right Now!

Wheat, barley, rice ... these are well-known and very popular grains used in everyday cooking. For a healthier and different seed to add an exotic flavor to your dishes, have you tried quinoa? This Peruvian grain or pseudocereal is actually the seeds of a type of goosefoot plant. Pronounced as "keen-wa", quinoa is a staple ingredient in South American cuisine and was treasured as the "mother of all grains" by the Incas. Indeed the health benefits of quinoa rank it as a veritable treasure chest of nutrients, especially when compared to other cereals and grains. To add to its appeal, its use is not restricted to South American dishes and quinoa can be found in many recipes. In this article, we look at some quinoa breakfast cake recipes for a healthier breakfast snack or dish alternative.

Gluten-Free Quinoa Cake
Ingredients:
  • 1½ cups quinoa flakes
  • ½ cup sorghum flour
  • ½ cup tapioca starch
  • ¾ cup almond meal flour
  • ½ teaspoon sea salt
  • 2 teaspoons ground cinnamon
  • 1 cup organic light brown sugar
  • 1 teaspoon xanthan gum
  • 1 teaspoon baking soda
  • 2 large eggs, organic (egg substitute can also be used)
  • ½ cup light olive or safflower oil
  • ¼ cup sorghum molasses or raw organic agave
  • 2 teaspoons bourbon vanilla extract
  • 1 cup grated carrots
  • ½ cup grated coconut, sweetened
  • ½ cup seedless raisins
  • ¼ cup orange juice
Method:
  1. In a bowl, whisk the 2 types of flour, the quinoa flakes, starch, soda, salt, gum and cinnamon
  2. In a separate large bowl, beat the eggs, oil, sugar, molasses, extract and orange juice
  3. Mix together the contents of both the bowls and beat well. To this mixture, add the carrots, coconut and raisins, stirring well with the addition of each ingredient
  4. Preheat the oven to 350 degrees F. In a 10x13 inch baking pan, place greased foil or parchment. Leave the cake batter to rest
  5. Pour the cake batter into the baking pan. Make sure the batter is spread uniformly in the pan
  6. Bake for 25-35 minutes. Check if cake is ready, by inserting toothpick into cake center. The center should be quite firm to touch, not gooey or sticky
  7. Leave cake to cool, then cut into 15 pieces and wrap in foil. Store them in a bag and refrigerate for later use
Spicy Apple Quinoa Breakfast Cake
Ingredients:
  • 2 cups cooked quinoa
  • ¼ cup whole oats
  • ½ cup agave nectar
  • 2 whole apples, medium-sized with skin, cored and grated
  • ½ cup raisins
  • ½ cup sunflower seeds
  • ½ cup any light oil (sunflower, safflower)
  • 1⅓ cups whole oat flour
  • 2 teaspoons chia or flax seeds, finely ground
  • 2 teaspoons pure vanilla extract
  • 2 teaspoons cinnamon, ground
  • 1 teaspoon cardamom
  • 1 teaspoon ginger, ground
  • 1 teaspoon apple cider vinegar
  • 1 teaspoon baking powder
  • ½ teaspoon baking soda
  • ½ teaspoon salt
Method:
  1. Preheat the oven to 350 degrees F. Use a 9 inch square pan for baking and grease or line it with parchment
  2. Mix the apple, agave nectar, oil, flax or chia seeds, quinoa, vinegar, vanilla, sunflower seeds and raisins in a bowl. Keep aside
  3. In another bowl, sift the oat flour, baking powder and soda, ginger, cinnamon, salt and cardamom. Add oats to this bowl and mix well
  4. Add the contents of the wet mixture bowl into the first bowl and stir well. A thick batter should be formed
  5. Pour the batter into the baking pan and spread evenly. Make sure the top is smooth. Bake for 30-40 minutes. You can test if the cake is ready, by inserting a toothpick into the center. If it comes out clean and dry, the cake is ready. Remove cake from oven and leave to cool. After it has cooled completely, cut into slices